Milestone #2! Machined & Tested
- Sandra Li
- Nov 18, 2019
- 3 min read
Updated: Nov 18, 2019
All of our molds have be machined, tested and optimized!
We'll begin with a quick overview!
Our design comprises four molds:
Top Housing
Segment Cover
Bottom Housing
Coke Bottles
...and two thermoformed dies:
Transparent Cover
Segment
Here is a cross-section of our yo-yo to remind you of our design:


... and an annotated version to help identify the components:

Next lets discuss our progress:
Top Housing Mold
After Milestone #1, our top housing mold was designed as follows:


We initially had difficulties machining; our CAM had an erroneous tool-path while adding runners which twice ruined our mold (at the end of the machining process!).

However, our third attempt proved successful!

Unfortunately, our happiness was short-lived. We soon discovered that our ejector-pin placement was less than ideal, and additionally the depth and width of our mold cavity meant that plastic frequently got stuck -> causing injection molding downtime.
Here are some of the parts created with this mold: (they were not great! Also, please excuse the unsanitary color)


So... we tried again! This time we chose to split the mold differently:


... and after machining:

This design was considerably more successful! Here are some of the parts we created:


Segment Cover Mold
Following a similar structure, lets start with our segment cover mold design:


... and now let's look at our machined mold:

We were able to successfully machine this the first time and begin experimenting with different shot sizes:


However, we soon realized that despite achieving a great finish, the segment cover would not have enough rigidity to snap fit into the bottom housing. So we re-designed our segment cover to be thicker and our bottom housing to accommodate this additional height. Then we re-machined our segment cover mold:

After testing the molds, we found that the part was too thin and the ejection pins had trouble ejecting the part. Additionally, we found that our mold was not centered so we are working on fixing this issue and re-testing.

Bottom Housing Mold
Here's our bottom mold design:


Our initial attempt at machining was unsuccessful due to an accidental change in co-ordinate systems while drilling the shoulder bolt hole, as can be seen below (it's off-center):

Our second attempt was a lot more successful (and produced a great surface finish)!

Next we began optimizing the shot size and clamping force through a series of trial and error attempts. Here is an example of a too small and too large shot size:


After iteration, we managed to find the optimal process parameters:

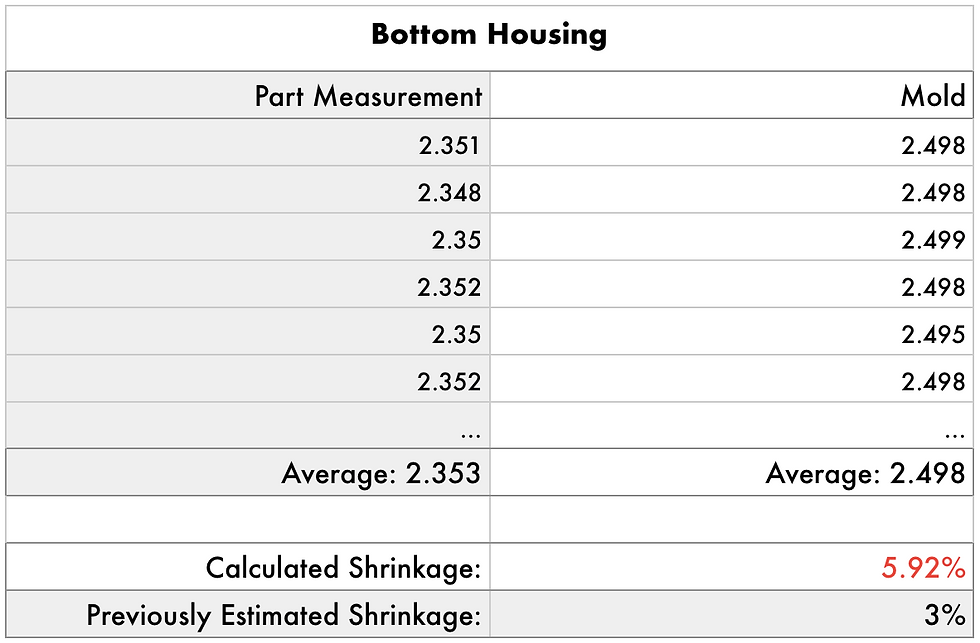
Upon combining our bottom and top housings we discovered they did not snap fit as required! We hypothesized that this was due to a difference in shrinking percentage, so we decided to investigate. We took over a dozen measurements from the top housing mold and the handful of parts we'd manufactured. The calculated shrinkage percentage was 5.92%, significantly larger than the 3% we had accounted for:
So we updated our CAD/CAM model and re-machined our bottom housing mold:

Our next step is to test this using the injection molding machine and retry the snap-fit!
Coke Bottles Mold
Our initial mold was designed as follows:


However, after consideration, we altered the layout to better accommodate runners:

Next we machined the mold and experimented with the injection molding process parameters to create some cute coke bottles!


Transparent Cover Thermoforming Die
For the thermoforming dies, we chose to 3D print rather than machine. This sped up the prototyping process:


We were able to test this and create prototypes of our transparent cover. After punching, these fitted snug into our top housing prototypes:

Segment Thermoforming Die
Similarly, following 3D printing:


After testing, we discovered that the thermoforming pressure was enough to concave the 3D printed part (because it was partially hollow):

(the center hole-dents are irrelevant since they will be removed after punching)
To fix this, we re-printed our die without a hollow center. This prevents the part from concaving.

Moving forward, we still need to test the sizing of all of the parts with new molds and see if they fit together (and adjust accordingly).


Comments